Friday 23 July 2010

Showcase: Farseer

Another showcase from my growing Eldar army today, in the shape of my farseer. Of the several different makes of farseer that GW make, this one has got to be my favourite. The pose and flow of the model is just plain gorgeous, and it was a real treat to paint.
In particular, I wanted to try to refine my blending techniques, and to try out a technique for painting crystal weapons that I found in White Dwarf a few months ago. Here's a brief rundown on painting the model, starting from a black basecoat:
The white sections of the robe started with a coat of Astronomican Grey, followed by a thinned down wash of Badab Black. This was then highlighted with a layer of Fortress Grey, before two thin coats of Skull White were applied. The red waistband and wrist banding were painted in Red Gore, then highlighted in four stages by adding increasing amounts of Elf Flesh to the first colour. This was then finished with a wash of Leviathan Purple, to add depth to the colour, and a good deep set of shading.
The black sections were highlighted with a 50/50 mix of Codex Grey and Chaos Black around the edges, followed by Codex Grey, then Fortress Grey, each stage getting progressively thinner. These sections were then given a coat of Badab Black, to combine the highlights.
The green cloak was tricky. I started with a coat of thrakka Green, to get a nice deep shade in the cloak recesses. I then layered on Dark Angels Green, then blended on about seven more layers, through steadily lighter mixes of Dark Angels and Snot Green, until the most raised edges were highlighted in pure Snot Green. A fun tip for blending is to tie the layers together visually by going slightly lighter than you normally would, then tying the whole shebang together with a wash of the darkest colour, very VERY thinned down into a glaze... foundation paints aren't great for this, though, so the glaze was Dark Angels Green.
The crystal blade technique is fairly tricky, but soooo worth the effort... it goes something like this: start with a coat of 50/50 Hawk Turquoise and Space Wolf Grey. Each time the object you are painting changes aspect or facet, the colour will alternate between light and dark... see the photos below for an idea on what I mean. So pick where the 'light' on your model is coming from, and highlight accordingly. For the dark sections, add a small amount of Regal Blue to the original mix, and blend it toward the centre of the dark sections. With each stage, add more Regal, until you get pure Regal Blue in the very centres of each 'lowlight'.
For the light sections, first start by increasing the amount of Space Wolves Grey, until you have pure Space Wolves Grey; use this to hard-edge highlight the very edges of the item you are painting, too. Then start highlighting further, adding small amounts of Skull White each time, until the final highlight is pure Skull White. Finally, add small reflective stripes to the dark sections of the item; again, see the pics below... they aren't amazing, but as always they're the best of a bad bunch :)
All comments are welcome, as ever. Hope you like the pics.
~MyBlueOblivion


Friday 7 May 2010

Showcase: Avatar of Khaine

Second in my Eldar showcase is my Avatar of Khaine. Almost as soon as Forgeworld released this larger, updated version, I knew I had to have one; it's a gorgeous remake of a classic model. Having one to hand for my army is also very thematic, as Biel-tan seem to field these combat monsters as a matter of course.
First things first, I decided that such a gorgeous model needed a bit more work on its base than I'd normally go for... that said, I'm taking the Eldar up to what I call 'showcase standard', so its geting a lot more work than a normal playing army overall. After building the Avatar, I first added one of the small Isha statuettes from the Dire Avengers kit. This looked a bit odd standing on its own, so I struck on the idea of it being part of a larger ruin. Some carefully applied Green Stuff later, and I'd sculpted a kind of ruined 'step' onto one side of the base. It looks a little like the Avatar just stepped down from it, so maybe it's the edge of a part-ruined webway portal... or something like that! I then added a resin Space Wolf icon from the scenic basing kit - those kits are brilliant, and for the price you pay contain a tonne of bits - and I couldn't help having a dig at my brother's Wolves :).
The paint scheme was started from a white basecoat, which is a bit unusual for me as I prefer starting with Chaos Black. The cracks and rents over the model's body were painted first, starting with Blazing Orange, blending upward through Golden Yellow to Sunburst Yellow, then to Skull White in the deepest parts of the model... kind of 'reverse highlighting'.
The raised sections of armour started with a coat of Scab Red, then was blended through Red Gore to Blood Red towards the plate edges. A fine line of Blazing Orange was then added to the edges of each plate, before a thinned down wash in 50/50 Baal Red and Devlan Mud.
Originally, the Wailing Doom (the beasty's sword) was painted in a Charadon Granite-based scheme. Just recently, though, while painting my army's Farseer, I came across a fun painting article in White Dwarf... it's in the Beastmen release article, if you fancy a look. I liked the effect on the Farseer so much, that I decided to try it out on the Avatar. The end result is striking, and actually lightens up the colour scheme of the model.
Lastly, the hieroglyphic markings on the Avatar's - Horns? Antlers? - and the glyphs on his loincloth were painted on freehand. Again, it's advisable to mark out where your icon is going, to make it easier to keep the symbol neat; myself, I just go for it. In the end, go with whatever you feel most comfortable with, but don't be afraid to push the envelope... you won't know what you can do until you try!
~MyBlueOblivion


Showcase: Warp Spiders

Just to prove that the blog isn't dead, it's time for some new posts, this time from my growing Eldar army :)
First up is my Warp Spiders squad, including my converted exarch. The five of them were good fun to paint; I've always enjoyed painting red, and as that is the main colour for this particular Aspect, it was a bit of a treat.
The colour scheme starts with Mechrite Red, which is then layered up through Scab Red to Blood Red. Edge highlights were added in Blazing Orange, then the armour was washed in a mix of Baal Red and Devlan Mud. The weapon muzzles were painted in Dark Angels Green, slowly blended up through Snot Green to 50/50 Snot Green and Skull White. A final spot of Skull White was put in the centre of each section; this was then washed quite heavily with Thrakka Green wash, leaving the weapon looking like it is glowing.
To make the squad stand out a little, I decided to paint an individual 'spider web' pattern onto each of their jump packs in Skull White. The trick to this is combining a steady hand with properly thinned paint; too thin, and the white won't cover properly, too thick and it looks like the spiders drew the motiffs on in crayon! If you want to try something like this, I would suggest following the advice seen in a recent White Dwarf. Mark out roughly where you want the pattern to go, or even draw it out on paper before you start.
I did none of the above, of course, but then I didn't get the title FlashGit for nothing :) I hope to add more spiders to the squad at some future date, but for now, the squad looks nice as it is, methinks.
~MyBlueOblivion


Monday 1 March 2010

Showcase: Chapter Master Lazerian

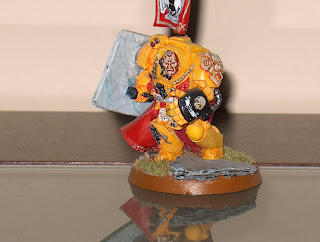
This is one of my older projects, an Imperial Fists Chapter Master. Lazerian was done as a commission piece, one of several done for the Tempus Fugitives 'Age of Apostacy' campaign weekend a few years back. The Fugitives were operating out of our local GW at the time (a few of them still are), and when the campaign weekend went into its planning stages it was decided that they wanted a set of special character models that could be used at different points during the weekend. Some of the veterans at the store were asked if they would like to model and paint these characters, and I was lucky enough to be asked to do two of them; Chapter Master Lazerian, of the Imperial Fists chapter, and Gaius Walkenen, commander of the Dimmamar PDF... I may post pics of him at a later date.
As a base for the model, I used the gorgeous Captain Lysander model... it's one of those hero models that's just a joy to paint. To the basic kit I added a banner and power fist from the plastic terminator kit, and a ForgeWorld rhino door (with appropriate logo, obviously!).
Now, this was painted in the pre-foundation paints era, so approaching the yellow armour was something of a challenge for me (it's not an easy colour, I wanted it to look as good as possible). I tried a technique I found in GW's How To Paint Citadel Miniatures... basically, you water down the paint with ink instead of water. This allows you to thin the paint, while not losing any of the pigmentation. I started with Golden Yellow, mixed with red and yellow inks, before highlighting with first Golden Yellow/Yellow Ink, then Sunburst Yellow/Yellow Ink. Bleached Bone was added for the later highlight stages.
The marble effect on the shield is tricky, but with practice has become one of my signiature painting effects. I start with Fortress Grey, then paint over this in four or five stages, adding more Skull White with each layer, until the mix is almost pure Skull White... start with thick bands, leaving thinner stripes of Fortress Grey in between, then highlight each of those thicker segments of colour in increasingly narrow strips (if that makes sense?). Once that's done, I add very thin 'veins', running in roughly the same direction as the striping; these are a mixture of Fortress Grey and Enchanted Blue. Finally, a very thin glaze of Skull White is applied to the whole surface. There are probably much easier ways, but it works for me!
Enjoy the pics, any and all comments are welcome!
~MyBlueOblivion


Dark Elf showcase: Black Dragon

Hi guys!
Here we have another showcase article from Virus' extensive Dark Elf army, this time a converted Lord on Black Dragon.
When the latest edition of High Elf dragon kit hit the shelves, Virus couldn't help himself... he just had to have one. And, in typical FlashGitz style, he's converted the kit extensively. The pics here (the only legible ones from the batch we took - ~Blue) show the work done quite well, we think.
Every part of this comes from the original kit; that is to say, nothing extra was added to make it more 'Dark Elf'-ish. The pillar of rock that the beast is perched on was the first thing to get changed, with expert application of a hobby saw and some green stuff for filler. The dragon itself was then repositioned; every 1/2 inch or so the main body was cut, from neck to tail. The body was bent forward to the desired position, then the gaps were filled, again with green stuff.
The a standard cigarette lighter was used to heat the wings, allowing them to bent inward and into a more 'swooping' position; be very careful if you try to do this kind of thing at home. Fire's dangerous to start with, and plastic will melt very quickly if you get it too hot!
Virus used parts from the Dragon Mage and Lord segments of the kit to make his rider, cutting and changing axe to make it look more menacing. Then, he used spare bits to make the dead Swordmaster on the base... very grim indeed.
On the painting front, Virus decided to go with a dark blue colour, rather than the more traditional black/grey that GW tends to go with... nonetheless, the finished article is striking, and looks terrific on the tabletop. Virus doesn't use it very often, preferring to use a Lord either on a Cold One or a chariot, and instead only rolls out the dragon for larger games.
Hope you enjoy the pics... more coming soon!
~The FlashGitz


Sunday 7 February 2010

Showcase: Plague Hulk


Making the Plague Hulk:

I started the Plague Hulk by asking myself, "what have I got myself into here?" It's just such a mad project. Without any further thought, I got on with the deed at hand.
I started by looking at the modelling instructions for the Soul Grinder. When I'd finished laughing, I hit upon the idea of Green Stuff all the way (you can see what effect this project has had on my dwindling sanity!). I started assembling the Plague Hulk by following the basic frame work of the Soul Grinder... and hold on to your hats, 'cause it gets bumpy from here on in. The first thing that I did was put the front claws from the Defiler kit onto the front of the Plague Hulk, as this is one of the major changes from the Soul Grinder. I then started to assemble the rot cannon, and quickly found myself thinking "what on earth can I use?" I say this because my Death Guard Army is now so large, I just did not want to repeat myself (sorry fellow FlashGitz, I'm not boasting, honest guys).
I decided to use the antenna from the Planet Strike Bastion box set... yes, you heard me right, the antenna! I then cut off the end of the antenna and reversed it, making a rather good gun barrel. I then lowered the head of the Plague Hulk and changed the horns on the model, so it was more in line with a Nurgle theme, resulting in the model having custom 'rhino horns'.
After all this, I had a Plague Hulk with so many holes in it you could call it swiss cheese. So I rolled out the Green Stuff. I set about filling the holes, bulking out the model and enlarging the stomach, complete with split hide and intestines spilling out. After all this, I still thought the Plague Hulk was looking too clean. So out came my trusty files; after hours filing away, the model was starting to look a little more worn, so heading in the right direction. The final stage was my ace card: Copydex. I coated the entire Plague Hulk in Copydex. After the Copydex went clear (but not dry), I went over the model with an old brush, roughing up the Plague Hulk even more and making the metal look warped, rotten and decayed. I was now satisfied with the Hulk. What came next was the real challenge, painting...


Painting the Plague Hulk:

I started by undercoating the Plague Hulk in Chaos Black. I then went about dry-brushing the model first with Red Gore, then Blood Red, before building up through layers of Fiery Orange and then Blazing Orange. Next came a light coat of Boltgun Metal, followed by a mixed wash of Brown and Black Ink. After the ink had dried, I gave the model a light drybrush of Chainmail, before another light wash of Brown Ink.
I then went over the claws, painting them a rusty metal colour acheived by mixing Chainmail and Scorched Brown, as well as a little Chaos Black. I then went over a lot of the rents and dents in the armour, making them look like weeping sores or red rust with varying shades of red. After that I went over the pipes, first in Chaos black, then these were highlighted in Codex Grey. With the main bulk of the Plague Hulk finished, the time had come to take on the Daemon half!!
I began by painting the flesh of the Plague Hulk with Cameo Green, highlighted with Rotten Flesh. I then went over the model in a mixed wash of Brown and Black Ink. The next stage was to go over the flesh in Dwarf Flesh and then Elf Flesh. The flesh was again given a light coat of Cameo Green, followed by a dry-brushing of Bleached Bone. The cuts in the flesh were painted Red Gore mixed with Blood Red, then given another Brown/Black Ink wash. The last details on the flesh were the eyes and teeth, picked out in red and Bleached Bone, and that finished the body of the Plague Hulk.
The last thing to paint was the sword, which I went over with Dark Angels Green, highlighted with with Snot Green, then dry-brushed in Bleached Bone. The sword was then given a light wash of Thrakka Green, then after the wash was dry another coat of Bleached Bone was used.

With that the Plague Hulk was finished. After being matt varnished, the Plague Hulk was given a coat of Bright Varnish on the flesh and weapons, and all over the cuts, as well as around the rents and dents.

And with that the project came to an end. It was most enjoyable, and I must say I'm happy with the finished result. Next up for me is a 40K project to end all others that I've done (and that is saying something (lol)):- a Chaos REAVER TITAN!!!! Yes, a REAVER!!!!! Of course, when this project starts, the FlashGitz will be on hand with a blow by blow account of the REAVER!!! (Stop yelling Reaver! - ~Blue) project. Until then, happy modelling and gaming.
~Virus

Sunday 31 January 2010

Dark Elf showcase: War Hydra

Hey folks!
This is the first in a series of showcase articles, each displaying parts of the FlashGitz' armies. First up is Virus and his Dark Elf army for Warhammer Fantasy Battles.
Phil has been collecting Dark Elves on and off for several years. Its most recent incarnation has grown beyond anything that has preceded it; at last count, it weighed in at just over six thousand points, and that's not counting special characters and magic items!
In typical style for Virus, many of the units in the force are at least partly converted. The example shown here is just one of three War Hydras; he has two of the older models, and one from the newer release. The model has had some of its heads repositioned by careful application of a hobby saw, a little brute force and some green stuff. The creature has also been mounted on a crest of slate, and the end result is quite striking.
The handlers have also been converted, one of them now carrying a pair of whips. The 'anime'-like hair colour is something of a recurring theme amongst the army, and the colours range in places from the mint green seen here, to blue, to pink. When asked why he went in that particular direction, Virus simply gave the answer: "Why not?" It looks good arrayed on the battlefield, however, and at the end of the day what more could you want?
~MyBlueOblivion


Warp Spider w.i.p. Sneak Peek...

Hey all! Just a sneak-peek post this time, as work is still progressing fairly slowly with my Warp Spiders unit. The Exarch is finished, and his squad mates are about three quarters of the way there. I want to do a showcase post on them as a squad as soon as they're done, which will hopefully be in the next week or two.
'Til then, here's a couple of piccies of my favourite so far. The icon on his helmet turned out the best of a decent batch, and is some of my finest detail work to date. I think the 'spiderweb' design on the jump pack is quite cool too... each squad member has his own individual design, and it's taken me a while to do them. They're getting there though...
~MyBlueOblivion


Wednesday 13 January 2010

Plague Hulk W.I.P., part 2

Well folks here are the latest pictures of the Plague Hulk, it's still a work in progress, but all good things come to those who wait. This project is certainly one of the most fun I have had in a while, so I'm savouring the project. So for now, I'll leave you with these pictures of the model so far. Of course, when the model is finished I'll be adding a full assembly and painting article, as well as finished pictures; which, let's face it, is what we all like to see. But for now, I will leave you all to enjoy these...
~Virus


Sunday 3 January 2010

Chaos War Mammoth conversion

This was a really fun project for me. Back in November of 2008, a staff member at my local GW asked me if I had any ideas on how I would convert a Harad Mumakil from the Lord of the Rings range into a Chaos War Mammoth for Warhammer Fantasy. It turned out he wanted to use one at a campaign weekend the following March, but didn't want to fork out for the Forgeworld one. We discussed a few ideas, ranging from just painting it brown, to gluing flock and static grass to the model to make realistic fur (the idea was debunked by the thought of it moulting in his car...), to sculpting the fur on with Green stuff.
He knew I had done some sculpting projects in the past, with some quite good results, and so asked me if I would be willing to do the model for him as a commision piece. Intrigued by the challenge, I agreed, and so it was that I went home that night with a fully built and undercoated Mumakil, a sculpting tool, and about four packets of Green Stuff.
As soon as I started the sculpting work, I realised that it was going to be a far bigger job than I had thought. Looking at it, as I began putting a matted, almost wooly texture up the back legs, two things hit me at once; first, the fur was all wrong for doing the whole model, second, I had started having ideas on how a mammoth should look, and the Mumakil just wasn't it. The main problem was the head... it was the wrong shape, the ears were too low down, and the eyes were far too small. And so it was that what should have been a three week sculpt grew to (pun intended) mammoth proportions.
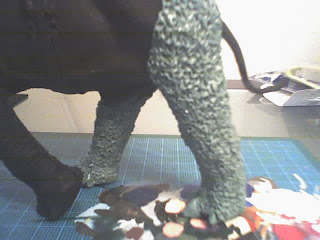
To fix the fur, I took the original, matted texture up the legs... the technique involves pushing into the Green Stuff at an upward angle in small increments, working it into flowing, hairy shapes. Use the pictures below to get an idea of what I mean. A second layer was then added, working from the top down, shaped to look like longer strands of hair. The two-tone effect was quite pleasing, giving the model a look of being steadily more matted and messy the nearer to the ground it gets.
A spiked collar was added to one of the back legs, first by sculpting the ring, then adding the spikes and a chain ring after it had dried. Claws were added, as well as decorative banding on the tusks. Then came the biggest challenge of the lot... the head.
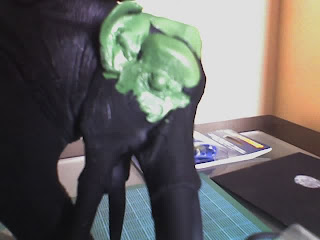
The top of the head was built upon, adding height and making a new shape. The ears were next, pushed roughly into shape with my thumbs, before the inner shapes were added. The really tricky bit, though, was the eyes. These were made by first making a ball of Green Stuff, then letting this dry. Once fully hard, the ball was then cut in two, to make the eyeballs themselves. A cushion of Green Stuff was added to each side of the head; the 'eyeballs' were pushed into this cushion, then using a sculpting tool the Green Stuff was pulled around the half-spheres to make the eyelids, which were then sculpted around, adding various lines and creases. Hair was then sculpted on to the head, bringing the rest of the head more into proportion, as the eyes did stick out a bit.
After that, I added some small extra details, such as the ring in the Mammoth's right ear, and a patch of bare skin on it's back end with a Chaos Star branded into it. All in all, I was very pleased with the result... if nothing else, it was a definite learning curve, and I never would have said it would turn out half as well when I started; it just goes to show that you don't know what you can acheive until you try. Here are the progress pics I took at the time (taken on my mobile, so I apologise for the poor quality), and then I'll put in a painting guide and the finished article pics. Enjoy!





And here are some shots of the finished article. The fur was painted first, by spraying on Calthan Brown with an airbrush. The model was then drybrushed with Khemri Brown, followed by patches of Snakebite Leather, to give the model an uneven, dirty feel. The ropes, wood, and wicker flooring in the howdah were painted Scorched Brown, the ropes drybrushed Snakebite Leather, then all of the surfaces drybrushed in Bleached Bone. The colours for the ropes were used for the tusks and claws, but these were layered on, starting with thin stripes near the top of the ivory parts, moving into block colours further down.
The cloth sides of the howdah were painted Mechrite red, then highligthed with Blood Red. Then pretty much the whole model, barring the flesh, ropes and eyes, were given a generous coating of Devlan Mud, after which the tusks and claws recieved another layer of Bleached Bone. The flesh was then painted, starting with a mixture of Scorched Brown and Dwarf Flesh, then Dwarf Flesh on its own, before adding a bit of Bleached Bone to the colour for a final highlight.
Lastly came the details. The rings and hooks around the howdah's ropes were painted Boltgun Metal, highlighted with Chainmail. Brazen Brass was used to paint the bronze sections, highlighted with Burnished Gold, then washed with Devlan Mud. The eyes were highlighted from Scab Red to Red Gore to Blood Red, the iris was painted on in Chaos Black, then streaks of Blazing Orange followed by Sunburst Yellow were added around the iris to add a bit of life.
Last, but not least, I decided to have a bit of extra fun, and hand painted a series of Chaos runescript around the inside of the howdah, using the alphabet from the Warriors of Chaos army book. I don't know if he ever translated them, but they spelled out the opening lines of the song 'Nelly The Elephant'! Well, it gave me a chuckle, at any rate.
So there you have it, one Chaos War Mammoth. And it only took me about three months to complete... I don't think I'll be doing another for quite some time! Let us know what you think, all comments welcome.
~MyBlueOblivion